
Sunday, December 31, 2017
Keep for Owlbears
I finally got around to painting my Keep (suitable for Owlbears). This took about no time at all. It was pre-primed (which is good since it's Styrofoam and can't be sprayed). I just painted the doors and arrow-slits and then dry brushed it with brown and light grey. Done.
 Now I've done with my buildings for now and should get back to campaign work.
Towerhouse
The second of the 2 laser-cut building kits I got at Fall-In is a Towerhouse (described as a city watch tower repurposed as a house.) This time I remembered the lessons of building my cowboy town and painted before I assembled. Inside and outside views displayed:


Saturday, December 30, 2017
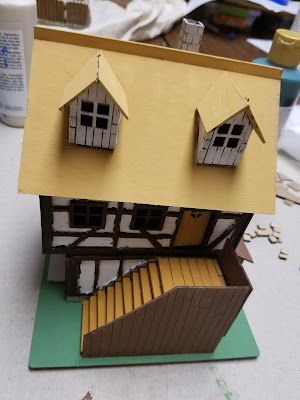
Townhouse
I bought this Medieval Townhouse model (laser-cut, wood and chipboard) at the Fall-In Convention in November. I finally assembled and painted it this week. The roof and the second floor are not glued fast, so we can take them off and deal with the interiors directly. I also (at least for now) just scotch-taped the doors on, so they can be opened and closed in play.


Thursday, December 28, 2017
Stockade
My Christmas present from the Mrs., a timber-stockade fort. I've gotten it painted. Should be useful for Fantasy, Dark Ages, and Wild West.


Monday, November 27, 2017
Stucco House with Courtyard
The second resin house I bought was better. The only thing wrong was that the roof was too small and fell right through the roof-hole, so I had to glue a wood rim around the edge to en-smallen the hole. Otherwise it was good.


Crappy Cabin
Here's the resin cabin I bought at the Fall-In convention earlier this month. The cast was disappointingly bad, so crooked that it wouldn't even sit flat properly. I have to glue on a wooden base with a shim to get it to stand properly and then some additional shims to make the roof sit flat on the house. The roof is removable, at least, so we can put guys inside during battles.


Friday, June 23, 2017
Dungeonographer, take 2
I tried making a map for this coming Sunday's To A Bloody Pulp game using Dungeonographer. This time I tried to get it down to 2 pages by 2 pages, but miscalculated on the margins, and got 2 pages by 2 pages plus 5 more scraps of pages. I decided to avoid drawing in walls and doors this time. I know there's a way to "snap" the wall drawing to the grid lines somehow, but I haven't found it yet. I decided to keep it as simple as possible. This time I did make a 1-page DM's map/tape together guide when I made the main map.
 I do still resent how much trial and error is involved in learning this thing, when it was billed as "intuitive" and "easy."

Thursday, June 22, 2017
First batch of Fantasy Dip
I decided to start giving some of my fantasy and historical miniatures the Miracle Dip treatment (who am I kidding, eventually it will end up being the whole lot of them). Since Katie wanted a miniature for her game, I had the Elf/Dwarf and the Women and Halfling Boxes (she's playing a female elf assassin--Stabby Jane) out on the table and decided to do the dip to those 2 boxes this week.
Here's a picture of the whole bunch of them dipped:
 And here's a close up of one elf, one dwarf, one woman and one halfling, dipped:
 It's hard to tell from the pictures, but the dip does bring out the details, especially on faces, robes and hair, but does give them all a Zach Snyder darkness. (It really does improve the cheesy looking large areas of bare flesh, the wood elf druid looks 100% better).
Here's a picture of the whole bunch of them dipped:


Tuesday, June 20, 2017
Dungeonographer and its kin
Okay, a week or so ago I bought the proversions of Hexographer, Hexographer 2, Cityographer and Dungeonographer. They were advertised as simple and user friendly. I had used several mapping programs in the past, a version of Campaign Cartographer and a tile-based mapper, both included in the "AD&D Core Rules CD-ROM" from the late 90's. Campaign Cartographer had a steepish learning curve, but I got the hang of it, and the tile-based mapper was really, really easy and I could make a town, dungeon or outdoor map in no time flat.
Well, I'm finding that the Hexographer bunch to be a big disappointment. First of all, the on-screen display is TINY. I even increased the display size on my PC from 150% to 200% just so I could see things a little more clearly. Second, far from intuitive and easy, it is very clunky. Selecting things to alter or remove is difficult, and half the time I end up just plopping down a second example of the thing to be removed. The instructions are lame. It's going to take an immense amount of trial and error before I can figure out how big to make various hexes or squares. It doesn't say "how big a piece of paper do you want" but rather "how many pixels per hex" what the fuck, how the fuck would I know that? Is the answer "many?" The instructions for changing the size of map elements are as clear as mud.
Campaign Cartographer was tough, but at least it was very easy to select a building icon, change its size or orientation without putting 6 copies of the building on top of the first one.
I did complete one project using the Dungeonographer program. I generated a random dungeon and saved it as 1 inch per square PDF and printed it out as a battlemat. My fault that I didn't print out a 1page version to use as a guide to putting the thing together. So, I trimmed off the margins and taped together the dungeon level. It was like doing a jigsaw puzzle. It's okay, but I don't know if it is better than drawing by hand. I found that if you generate a random map, it doesn't let you modify the floor tiles (unless there's a trick I'm missing).
I decided that it would be easier to add numbers by hand than to insert text labels, which I can do, but which is a process I find far too slow (why not just turn on a text button, click on the map and type "2"?). So, here's a picture of Dungeon Map 1, with a few miniatures for scale:

Monday, June 19, 2017

Friday, June 16, 2017

Thursday, June 15, 2017

Friday, June 9, 2017
Chicken Hag for the knights
A little painting work this week.
First: some kind of giant chicken-lizard thing
 Second, a Green Hag
 Next, some robed knights
 Finally, some old school guys from Jason's box of discards:

First: some kind of giant chicken-lizard thing


Thursday, June 1, 2017
Plate and Scale
Some more painting:
First, some dismounted plate armor knights with pole-axes
 Next, Sobek the Crocodile God (statue?)

First, some dismounted plate armor knights with pole-axes


Saturday, May 27, 2017
Map Mounted
I finally mounted the Darlene Greyhawk Map on a piece of foam board, it's not perfect, but is more than good enough for game purposes. It's actually much more convenient to use than my old 1980 copy, since it is a single piece, slightly smaller, but still big enough.


Wednesday, May 24, 2017
Map musings
I think what I may do with my Greyhawk map is to glue each half-map onto its own piece of foam board and just butt them together in use. Trying to glue them both onto the same sheet, and then getting them to match nicely, seems to me to be a recipe for disaster and disappointment. As Homer Simpson says, "trying is the first step toward failure, never try."
I was looking at various you tube videos, and while many suggested using spray adhesive, I think that "archive quality glue sticks" might be the route to take for me: more wiggle-room and ability to take things slowly, part by part.
I was looking at various you tube videos, and while many suggested using spray adhesive, I think that "archive quality glue sticks" might be the route to take for me: more wiggle-room and ability to take things slowly, part by part.
Sunday, May 21, 2017
Working on my "To Be Painted" Bin


Sunday, May 7, 2017
A Little Painting
I painted a set of 5 Robin Hood miniatures I bought, I think back when were about to briefly play Traveller a year and half ago or so. They were already based and primed, and I was up for some painting.
 I tried a "parchment" colored wash instead of the miracle dip. It isn't so overwhelming, but also isn't quite as good in bringing out the detail as the dip is. The "Little John" figure is the best (second from the right), I could totally see using him for a ranger PC.

Wednesday, April 19, 2017
Tooling around with D&D 5e
Since my daughter Katie has started playing some D&D5e with some of her friends, that got me curious about it. I wouldn't buy it when it first came out, since it was like $45 for the PHB, and we were deep in Adventurer, Conqueror, King at the time.
Now, you can get the PHB for less than $30 on Amazon, so I am giving it a look.
At first glance it seems most like 3rd edition, uniform advancement, stat bonuses, multi-classing ascending AC and so forth are all very 3rd edition.
But, I am starting to notice some really cool things about 5th edition.
1) AC inflation. A few dragons and supernaturals (demons, devils, celestials etc,) have an AC over 20, but they are rare. Also, the "to hit" bonuses are very, very narrow. First level characters (and even commoners) have a +2 to hit, plus STR bonus, but 20th level characters only have a +6 to hit.
So, for example, an Ancient Red Dragon has an AC 22 (near the highest I could find), a common Guard has +3 to hit. So, even a guard doesn't need a natural 20 to hit one of the toughest thing to hit.
With AC and to-hit flattened out, in actual combat low-level monsters are still dangerous in large numbers.
Conversely, say you have a 20th level fighter with 20 strength, that's +6 to hit plus +5 more from Strength. A guard has AC 16, so you don't even automatically hit him (you'd need a 5 or better).
I think that this is simply amazing and what I've been looking for in D&D for a long time.
2) Spells: casters can use Cantrips at will, and most casting classes have a cantrip that does some damage, so wizards can make some sort of magic attack all the time. I mean that's why you want to play a wizard.
The other thing is that they've, in a way, nerfed most "Save or Die" type spells. For example, the dreaded "Hold Person" requires that you maintain concentration. Polymorph is the same. Flesh to Stone requires several saves be failed before permanent stoning. Even invisibility requires concentration. Other spells, like Phantasmal Force, Phantasmal Killer, and Color Spray are actually much better described and mechanically clear cut.
It's a lot to chew over, but I am actually very pleasantly surprised by its general goodness.

Sunday, March 26, 2017

Thursday, March 16, 2017
Back to Painting


Thursday, February 16, 2017
I kind of miss painting
I've done all my pulps, and we seem to have all we need. I miss painting. It's very relaxing. Need to get something. Hmmm. I could tidy up some bases and some of the overtly splotchy dip spots I guess. I do have that townhouse model to put together.
Sunday, February 5, 2017
Terrible Buildings
I finally went through my old train box and fished out the usable buildings. I washed them down and glued them together. Some were mine when I was a boy (mid 70's), some were my older brother's (mid 60's). They are all pretty bad. They are cheap, old and in bad shape.
 Group 1: a poorly assembled freight station, signal tower and factory.
 Group 2: a beaten-up savings and loan and a cheap motel. The motel looks far worse in person than it does in the picture. It was of pink plastic and my 12 year old self painted it yellow with poster paint, which is all thick and gloppy. It also is poorly aligned in its assembly.
 Group 3, small passenger station and platform. This one isn't too bad, other than being 40 years old and deteriorated.


Monday, January 16, 2017
Dipping the Wild West
This weekend I went back and did the Dip and Spray to all my Wild West miniatures. Below are some samples
First, some mounted men, I actually did dip these in the paint can, since there's so much area to cover with the horse and all.
 Next, here are some Indians, the Indians took to the dip procedure best of all the Wild West crew, you can really see it with the muscles on the guy to the right:
 Next, some of the cowboys:
 Next some of the Frontiersmen, including my ace Hatchet-swinging guy from Bushwhack Canyon:
 And finally, the Rojo Brothers and Pedro the Space Mexican

First, some mounted men, I actually did dip these in the paint can, since there's so much area to cover with the horse and all.


Monday, January 2, 2017
Pictures, after dip and spray
These are some of the best examples, but the shading effects and detail look even better in person.
First, 3 of the American Soldier Types
 Light is a little bright, but you can see the shading on the middle guy pretty well.
Second: the famous guys
 Some of the best: Bogart's coat looks even better in person, so does Teddy Roosevelt's face. You can really see the details on Doc Savage even in the picture
Third: some trouble makers:
 The Nazi scum on the left is cut off, but you can see some of the shading effect. The brawler in the middle is really good, and the mercenary with the dynamite on the right, really has his details and shading pop out.
First, 3 of the American Soldier Types

Second: the famous guys

Third: some trouble makers:

The Sprayening
After I dipped the entire pulp collection, I let it dry over night. Then through the day on Sunday, I sprayed them all with a matt finish to cut the high shine of the Minwax. I was really frightened by this, because of the internet. I just wanted to find out how long it takes for the matt varnish to dry (which I was completely unable to find out anywhere, even from the manufacturer), but I read these guys complaining that the stuff left a milky, cloudy effect behind, with other people yelling at them and telling them they were crazy or doing it wrong. There are temperature and humidity issues, apparently, but Sunday afternoon was 50 degrees outside, so it shouldn't be an issue.
Eventually, I just quit looking and tried it. It was no problem, the spray dries quickly (much more quickly than the dip) and I had no issues with white residue or cloudiness. The spray totally removes the bright shininess of the dip.
All told, after the whole dip and spray process, I'd say that it really makes details pop, gets rid of the chalkiness that the acrylic paint seems to have improved the look of the miniatures a great deal.
My Japanese and American infantry all really look much better. The pulp heroes who were wearing Beige or Green look absolutely fantastic (apart from a brown smudge here and there). Those wearing grey or black were mixed: the details pop, but they have some noticeable brown smudges on their grey clothes. Those in yellow turned out surprisingly well. The ones in white suffered a bit, but there weren't that many of them. I know now not to use white if I'm going to dip.
I may end up giving some of the bases another coat of Grey, since many of them have brown pools on them.
I'll post some pictures after work today.
Subscribe to:
Posts (Atom)